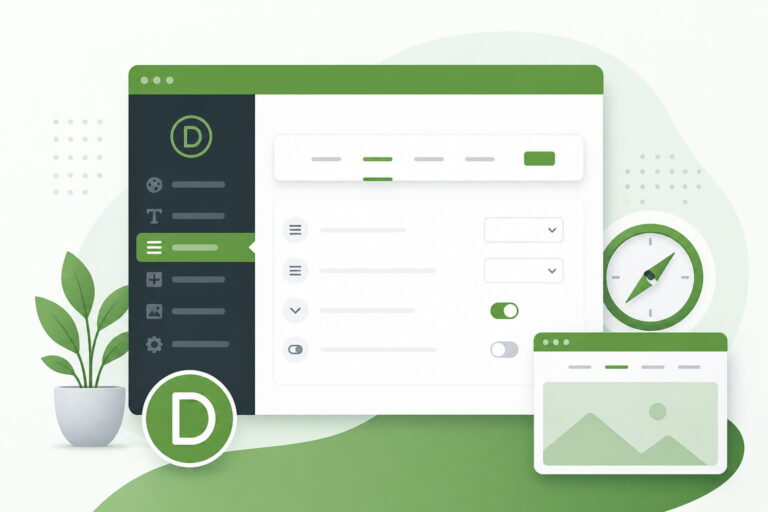
Setting up a new WordPress theme for the first time can feel like a lot of steps. With Divi, the process is more straightforward than most people expect, but only if you follow the right sequence. Skip a step or do things out of order and you will likely run into errors that take longer to fix than the original setup would have taken.
This guide walks you through the entire Divi theme setup process from start to finish. By the end, you will have Divi purchased, installed, licensed, and configured on your WordPress website.
If you are not yet sure what Divi is or whether it is the right choice for your website, read our guide on What Is Divi in WordPress before continuing.
What You Need Before You Start
Before you purchase or install anything, confirm that you have the following in place.
- A working WordPress installation. WordPress already installed on your hosting account. Divi is a WordPress theme, which means WordPress must be running before you can add any theme. Most hosts including Bluehost, SiteGround, and Kinsta offer one-click WordPress installation from your hosting control panel.
- A reliable hosting account. Divi works with any hosting provider that meets WordPress minimum requirements. However, a slow or unreliable host will affect your site performance regardless of which theme you use. Look for PHP 7.4 or higher, at least 256MB of PHP memory, and SSD storage.
- An active email address. You will need this to create your Elegant Themes account and receive your purchase confirmation.
That is it. You do not need any technical skills, coding knowledge, or special software to complete this setup.
How to Purchase Divi from Elegant Themes
Divi is sold exclusively through Elegant Themes at elegantthemes.com. You cannot purchase it from any other official source. If you come across a third-party website selling Divi at a steep discount, treat that with caution. Those are often nulled or pirated versions that do not receive updates and may contain malicious code.
Elegant Themes offers two membership options.
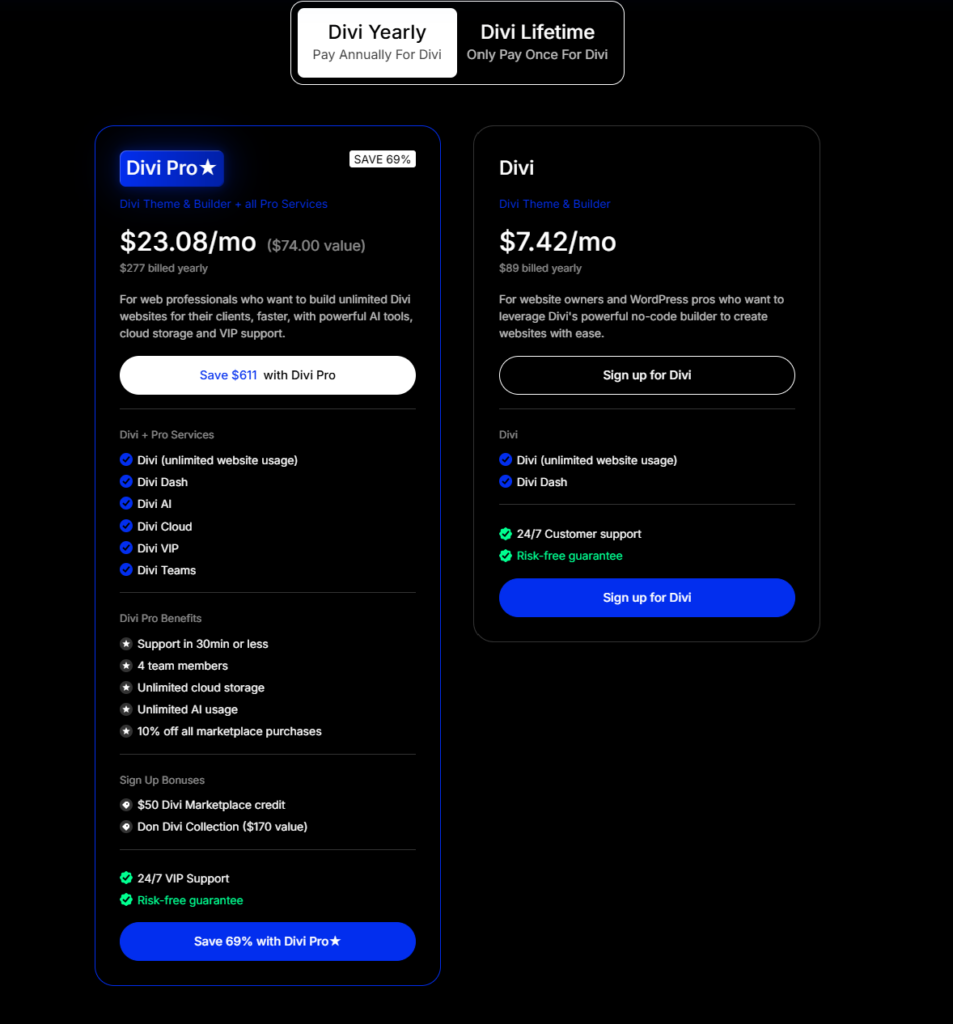
The Annual Access plan costs $89 per year. This gives you access to all Elegant Themes products including Divi, Extra, Bloom, and Monarch, along with premium support and all updates for one year. When your subscription expires, your websites continue working on the last downloaded version, but you stop receiving updates and support.
The Lifetime Access plan costs $249 as a one-time payment. You get lifetime access to all products, updates, and support with no recurring charges. For anyone planning to use Divi on an ongoing basis, this plan pays for itself within three years compared to the annual option.
To purchase, visit elegantthemes.com, click on the pricing page, select your plan, and complete the checkout. You will receive a confirmation email immediately with your account login details.
How to Download Divi from Your Elegant Themes Account
Once your purchase is complete, log in to your Elegant Themes account at elegantthemes.com/members.
From the member area, navigate to the Account section. You will see a list of all available downloads. Find Divi Theme in the list and click the Download button. This saves a ZIP file to your computer named something like Divi.zip.
Important: Do not unzip this file. WordPress requires the theme to be uploaded as a ZIP file. If you unzip it first, the installation will fail.
While you are in the member area, also note your Elegant Themes API key. You will find this on the Account page. Copy this key and save it somewhere accessible because you will need it shortly to activate your Divi license. The API key is a long string of letters and numbers unique to your account.
How to Install the Divi Theme on WordPress
There are two ways to install Divi on WordPress. The first method works through the WordPress dashboard and is suitable for almost everyone. The second method uses FTP and is only necessary in specific situations.
Method 1: Install via WordPress Dashboard (Recommended)
- Log in to your WordPress admin panel at yourdomain.com/wp-admin.
- From the left sidebar, go to Appearance and then click Themes.
- At the top of the themes page, click the Add New button.
- On the next screen, click the Upload Theme button that appears at the top.
- Click Choose File and select the Divi.zip file you downloaded from Elegant Themes.
- Click Install Now and wait for WordPress to process the file. This usually takes 10 to 30 seconds.
- Once the installation is complete, click Activate to make Divi your active theme.
Your WordPress site is now running on the Divi theme.
Method 2: Install via FTP
This method is only necessary if your hosting provider has a file size upload limit that prevents you from uploading the Divi ZIP file through the WordPress dashboard. It requires an FTP client like FileZilla.
- Connect to your server using your FTP credentials provided by your host.
- Navigate to the wp-content/themes/ directory on your server.
- Extract the Divi ZIP file on your computer first, then upload the resulting Divi folder to the themes directory.
- Once the upload completes, go to Appearance > Themes in your WordPress dashboard and activate Divi.
How to Activate Your Divi License
Installing the theme is not the final step. You also need to activate your Divi license using the Elegant Themes API key. Without this, your theme will not receive automatic updates.
- In your WordPress dashboard, go to Divi in the left sidebar and click Theme Options.
- In the Theme Options panel, click the Updates tab at the top.
- Enter your Elegant Themes account username in the first field.
- Paste the API key you copied earlier into the API Key field.
- Click Save Changes.
Divi will verify your credentials with the Elegant Themes server. Once confirmed, your license is active and your theme will receive updates automatically.
Keeping Divi updated is important. Updates include security patches, bug fixes, performance improvements, and new features. A site running an outdated version of Divi is more vulnerable to compatibility issues and security risks.
First-Time Divi Theme Options Configuration
Once your license is active, spend some time in the Theme Options panel to configure your site’s global settings. These settings apply across your entire website, so it is worth setting them up correctly from the beginning.
General Settings
The General tab is where you upload your website logo and set your favicon. Your logo should be a PNG file with a transparent background for the best result on different header backgrounds. The recommended favicon size is 32×32 pixels.
You can also set default color values for links and other elements here. If you have a brand color, set it in this section so it applies consistently across your site.
Navigation Settings
The Navigation tab controls your header layout and menu behavior. Before configuring your menu here, create a menu in WordPress first. Go to Appearance > Menus, create your main navigation menu, and assign it to the Primary Menu location.
Once your menu exists, the Navigation tab in Divi Theme Options lets you control how your header behaves. You can set the header style, enable a fixed navigation bar, and control the behavior of dropdown menus.
Builder Settings
The Builder tab controls how the Divi page builder loads on your pages. The most relevant setting here for new users is the option to enable the Visual Builder by default. The Visual Builder is the front-end editor that lets you see your changes live on the page as you make them.
SEO Settings
The SEO tab in Divi Theme Options contains basic SEO configuration options. However, if you plan to use a dedicated SEO plugin like Rank Math or Yoast SEO, disable Divi’s built-in SEO settings to avoid conflicts. Both plugins handle SEO more comprehensively than the built-in options.
How to Set Up the Divi Builder on Your First Page
With your theme installed, licensed, and configured, you are ready to start building pages.
- Go to Pages in your WordPress dashboard and either open an existing page or create a new one.
- On the page editing screen, click the Use The Divi Builder button.
- The Divi Builder presents three options: Build From Scratch, Choose a Layout, and Clone Existing Page.
- For your first page, Choose a Layout is the easiest starting point. Browse the Divi Layout Library, select a layout that matches your needs, and click Use This Layout.
- Click Enable Visual Builder at the top of the page to switch to front-end editing mode where you can see your changes in real time.
- Click on any text to edit it, click on any image to replace it, and use the settings panels to adjust colors, spacing, and typography.
- When you are satisfied, click the purple Save button at the bottom of the screen and publish the page from the WordPress dashboard.
Installing a Divi Child Theme
A child theme is a separate theme that sits on top of the Divi parent theme and inherits all of its functionality. Any customizations you make in a child theme are preserved even when Divi updates. Without a child theme, custom CSS or code changes added directly to Divi can be overwritten by updates.
For a new website, installing a child theme from the beginning is the cleaner approach. You can generate a basic Divi child theme for free using tools available online, or download one of the many professionally designed Divi child themes that come with their own layouts and design styles.
Child themes are installed the same way as the main Divi theme: download the ZIP file, go to Appearance > Themes > Add New > Upload Theme, upload the ZIP, and activate it.
Common Divi Installation Issues and How to Fix Them
Even with a straightforward process, a few common issues come up during Divi installation. Here is how to handle them.
“Are You Sure You Want to Do This?” Error
This error appears when the Divi ZIP file is too large for your hosting server’s maximum upload size. The default PHP upload limit on many shared hosting plans is 2MB, while Divi is larger than that.
The fix is to increase the maximum file upload size in your hosting account’s PHP settings, or contact your hosting support and ask them to increase the upload limit. Alternatively, use the FTP installation method described earlier in this guide.
Divi Builder Not Loading
If you activate Divi but the builder does not load on your pages, the most common causes are a plugin conflict or a browser caching issue.
- Clear your browser cache and try again.
- If the builder still does not load, deactivate all other plugins temporarily. If the builder loads after that, reactivate plugins one by one to identify the conflict.
- A JavaScript error in the browser console can also prevent the builder from loading. Check your browser’s developer tools for any error messages.
White Screen After Activation
A white screen after activating Divi usually means a PHP memory limit issue. Increase the WordPress memory limit by adding the following line to your wp-config.php file:
define(‘WP_MEMORY_LIMIT’, ‘256M’);
If you are not comfortable editing wp-config.php, contact your hosting support and ask them to increase your PHP memory limit to at least 256MB.
What to Do After Divi Is Set Up
With your Divi theme fully installed, licensed, and configured, here is what to focus on next.
- Install an SEO plugin. Rank Math is the recommended option for Divi websites. It is free, well-maintained, and integrates cleanly with the Divi builder without causing conflicts.
- Set up Google Analytics. Connecting your site to Google Analytics from day one means you have data from the very beginning. Add your tracking code through Divi Theme Options or through a dedicated plugin.
- Create your core pages. At minimum, create a homepage, an about page, a contact page, and a blog page. These are the pages most visitors expect to find.
- Configure your permalink structure. Go to Settings > Permalinks in WordPress and select the Post Name option. This creates clean, readable URLs that are better for SEO than the default numeric structure.
- Start building your content. Your Divi setup is complete and your site is ready. The next step is designing your pages and publishing your first posts.
Frequently Asked Questions
Can I install Divi on multiple websites?
Yes. A single Elegant Themes membership covers unlimited websites. There is no per-site licensing fee. This makes Divi especially cost-effective for freelancers and agencies managing multiple client sites.
What happens if I do not renew my Elegant Themes membership?
Your website continues working normally on the version of Divi you had at the time of expiration. You lose access to future updates and premium support, but your existing site is not affected. Renewing restores full access.
Do I need a child theme for Divi?
It is not strictly required, but it is strongly recommended. A child theme protects any customizations you make from being overwritten when Divi updates. If you plan to add any custom CSS or code to your site, always do it in a child theme.
Can I switch from another theme to Divi without losing content?
Yes. Your content including posts, pages, and media is stored in the WordPress database, not in the theme. Switching themes does not delete your content. However, your page layouts will need to be rebuilt in Divi because layouts are theme-specific.
How do I update Divi after it is installed?
With an active license, Divi updates appear automatically in your WordPress dashboard under Appearance > Themes or Dashboard > Updates. Always back up your site before running any updates.
Is Divi compatible with WooCommerce?
Yes. Divi is fully compatible with WooCommerce. You can use the Divi Builder to design your shop pages, product layouts, and checkout pages. There are also Divi child themes and layout packs designed specifically for WooCommerce stores.
Can I use Divi without the visual builder?
Yes. The Divi theme functions as a standard WordPress theme without the builder. However, most of Divi’s design flexibility comes from the builder, so most users enable it.
Wrapping Up
Divi setup takes less than 30 minutes when you follow the steps in sequence. Purchase your membership, download the theme ZIP, install and activate it in WordPress, enter your API key, configure your Theme Options, and you are ready to start building.
The most common mistakes new users make are skipping the license activation step, forgetting to set up a child theme before adding customizations, and trying to install a pre-unzipped theme folder. Avoid those three and your setup will go smoothly.