Every Divi designer has faced the same problem at some point. You spend time getting a button or a blurb module looking exactly right, then you need the same style on another page and have to either rebuild it from scratch or copy-paste styles one module at a time. It is slow, inconsistent, and the kind of repetitive work that kills momentum.
Divi Presets solve this problem directly. A preset is a saved set of design settings for a specific module type that you can apply across your entire website with a single click. Change the preset once, and the change updates everywhere that preset is used automatically.This guide covers what Divi Presets are, how they evolved from Global Defaults, how to create and manage them in both Divi 4 and Divi 5, and the practical workflows that make them worth using on every project. If you are still getting familiar with the Divi Builder itself, read our guide on Getting Started with Divi Builder (Step-by-Step) before working through this one.
What Are Divi Presets?
A Divi Preset is a saved design configuration for a specific module type. It stores all the styling decisions you have made for that module, including colors, typography, spacing, borders, backgrounds, and animations, and makes those settings available as a reusable style you can apply to any other module of the same type.
The key distinction from simply copying and pasting styles is that presets are global. When you update a preset, every single module on your website that uses that preset updates automatically. You do not have to hunt down individual modules page by page. This makes presets a genuine design system tool rather than just a convenience feature.
Presets are module-specific, which means a Button preset only applies to Button modules, a Blurb preset only applies to Blurb modules, and so on. You cannot apply a Button preset to a Text module. This constraint is intentional because different module types have different settings, and a preset is meaningless outside the context of its module type.
EXPERT OPINION Think of Divi Presets as the equivalent of CSS classes in a design system. When you update a CSS class, every element using that class updates immediately. Presets do exactly the same thing inside the Divi Builder, without requiring any code. For teams building multiple client sites, presets dramatically reduce the time spent on design consistency work. For solo builders, they eliminate the most repetitive part of page building.
Divi Presets vs Global Defaults: What Changed
Before Presets existed, Divi had a feature called Global Defaults. Global Defaults let you set one default style for each module type. Every new module you added automatically started with those default settings.
The limitation was the word “one.” You could only have a single default style per module type. If your site used three different button styles across different sections, you could only designate one as the global default. The other two had to be styled manually each time or copied from an existing module.
Divi Presets replaced Global Defaults and removed that limitation. Now you can create as many presets as you want for each module type. You set one as the default, which applies automatically to new modules, and the others are available in a dropdown whenever you want to apply a different style to a specific module.
The practical effect is significant. A site with buttons in three different styles, a primary call-to-action style, a secondary outlined style, and a text-only link style, can have all three saved as presets. Applying any of the three to a specific button takes one click instead of rebuilding the styles from scratch.
How to Create a Divi Preset
Creating a preset takes less than a minute once your module is styled. The process is the same across all module types in Divi 4 and similar in Divi 5.
Method 1: Create a Preset from an Existing Styled Module
This is the most common method. You style a module exactly how you want it, then save those styles as a preset.
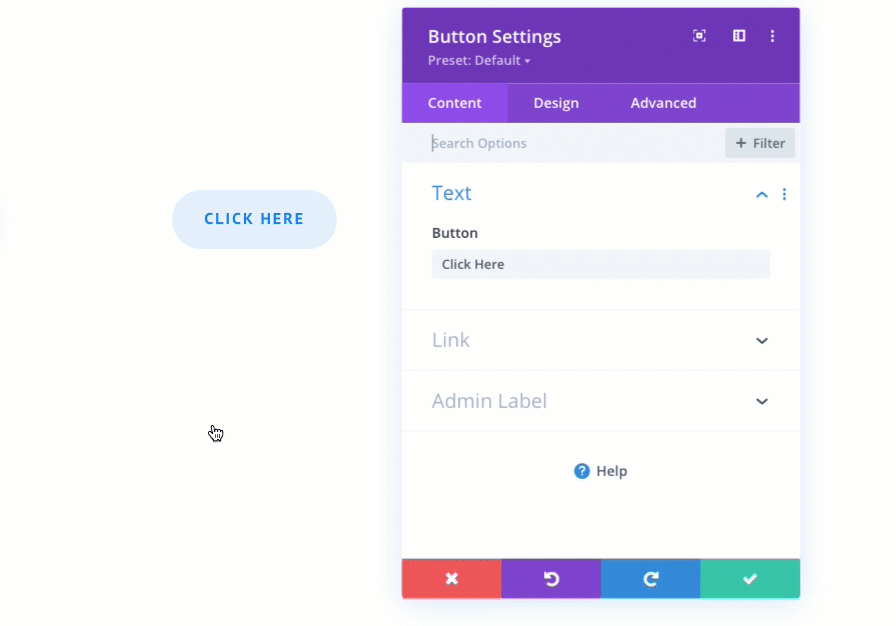
- Open any page in the Divi Builder and click on the module you want to save as a preset.
- In the module settings panel, look at the top of the panel just below the module title. You will see a Preset dropdown that typically reads “Default” or shows the name of the current preset.
- Click the dropdown arrow next to the preset name to open the preset menu.
- Select Create Preset from Current Styles.
- A dialog box appears. Enter a name for your preset. Choose a name that describes the style clearly, such as “Primary Button” or “Feature Card Blue”.
- Optionally, check Set as Default if you want this preset to apply automatically to all new modules of this type.
- Click Save. The preset is now saved and available across your entire website.
TIP Name your presets descriptively from the start. ‘Button Style 1’ tells you nothing six months later. ‘Primary CTA Button Green’ tells you exactly what it is and where it belongs. Good preset naming becomes important once you have ten or more presets in a project.
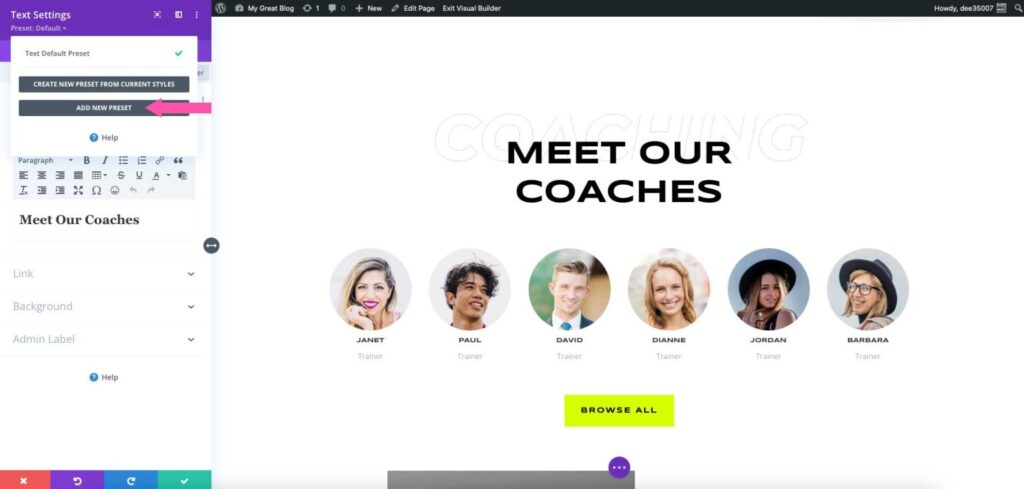
Method 2: Create a New Preset from Scratch
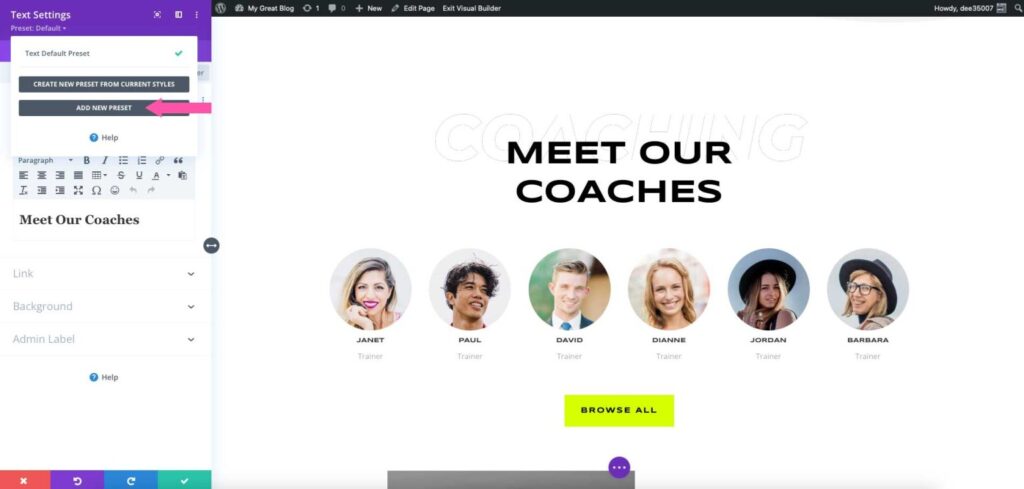
Use this method when you want to build a preset’s styles without starting from an existing module.
- Open any module settings panel.
- Click the Preset dropdown at the top of the panel.
- Select Add New Preset.
- Enter a name for the preset and save it.
- The preset is created with default styles. Open its settings using the preset menu and style it as needed.
Once styled, use the preset menu to select Update Preset with Current Styles to save your changes.
Method 3: Duplicate an Existing Preset
When you need a variation of an existing preset with minor differences, duplicating is faster than building from scratch.
- Open any module settings panel and open the Preset dropdown.
- Hover over the preset you want to duplicate.
- Click the three-dot menu that appears next to the preset name.
- Select Duplicate.
- Rename the duplicate and modify its styles as needed.
How to Apply a Preset to a Module
Applying a preset to an existing module is faster than creating one. It is a single action that replaces the module’s current styles with the preset’s saved styles.
- Click on the module you want to style.
- In the module settings panel, click the Preset dropdown at the top.
- You will see a list of all presets saved for that module type.
- Click the preset you want to apply.
- The module’s styles update immediately to match the preset. Close the settings panel.
The update happens live in the Visual Builder, so you can see the result before saving the page. If the preset does not look right in context, switch to a different preset or go back to the default with the same dropdown.
NOTE Applying a preset replaces all styling for that module with the preset’s saved styles. Any custom styling you had applied directly to that module will be overwritten. If you want to keep specific custom styles, create a new preset from the current module state before applying a different one.
How to Update an Existing Preset
Updating a preset is where the real time savings happen. When you update a preset, every module across your entire website that uses that preset is updated automatically.
- Find any module that uses the preset you want to update.
- Open the module settings and make the style changes you want.
- Click the Preset dropdown at the top of the settings panel.
- In the preset menu for the active preset, select Update Preset with Current Styles.
- Confirm the update. Divi applies the new styles to every instance of that preset across the site.
EXPERT OPINION This is the most powerful workflow in Divi Presets and the one most users underuse. If you decide your primary button color needs to change from green to blue, update the preset once and every button using that preset changes immediately. On a site with fifty pages and two hundred button modules, that is a change that would otherwise take an hour. With presets, it takes ten seconds. This is why setting up presets at the beginning of a project, before you start building pages, is the right approach.
TIP Before updating a widely-used preset, use the Divi History feature to create a restore point. If the update creates unexpected visual issues, you can roll back. The History button is available in the Visual Builder toolbar.
Divi 5 Presets: What Is New
Divi 5 significantly expanded the Presets system with new tools and tighter integration with the overall design system. The core concept is the same, but the management interface and the types of presets available are more comprehensive.
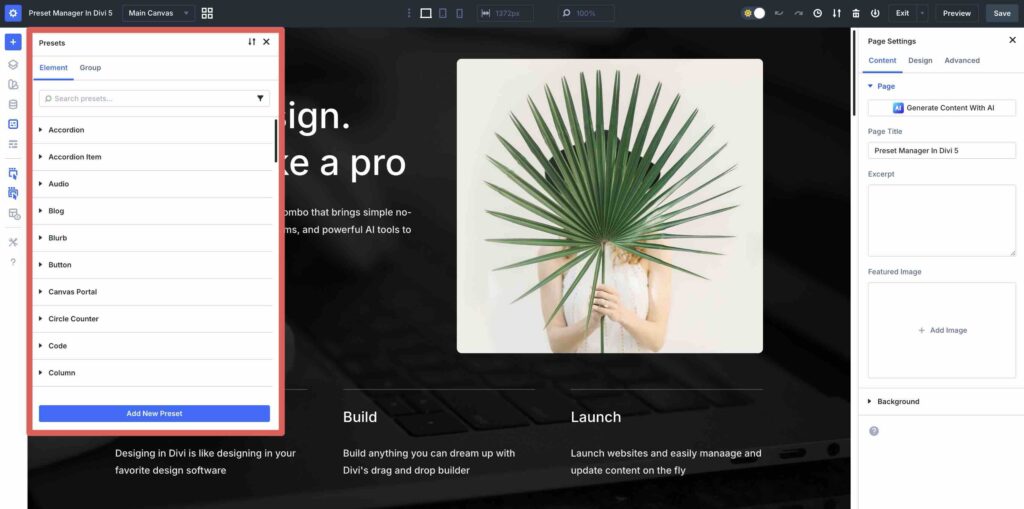
The Preset Manager
Divi 5 introduced a dedicated Preset Manager, accessible from the Builder Bar on the left side of the Visual Builder screen. The Preset Manager gives you a centralized view of all presets on your site, organized by element type.
From the Preset Manager you can create, edit, duplicate, delete, reorder, and set default presets for every module type from a single panel without needing to open individual modules. This is a significant improvement over Divi 4 where you had to open a module to access its presets.
Two Types of Presets in Divi 5
Divi 5 organizes presets into two categories:
- Element Presets are the same as presets in Divi 4. They save the complete styling of a specific module type such as a Button, Heading, or Blurb module.
- Option Group Presets are new in Divi 5. They save a specific subset of design settings, such as border styles, shadow settings, or spacing values, that can be applied across different module types. An Option Group Preset for border radius, for example, can be applied to buttons, cards, images, and any other module that has a border radius setting.
Option Group Presets make cross-module consistency easier. If your design system uses a specific border radius across all elements, you save it once as an Option Group Preset and apply it everywhere rather than setting it manually on each module type.
Integration with Design Variables
In Divi 5, presets work directly with Design Variables, which store your site’s global colors, fonts, and spacing values. When a preset references a Design Variable for its color or typography, changing the Design Variable updates every preset that references it. This creates a true design token system inside Divi 5. For a full overview of what changed in Divi 5, see our guide on Divi 5 Review: Features, Speed, Pros and Cons.
Copy, Paste, and Reset Presets
Divi 5 added Attribute Management, which lets you copy preset settings from one module and paste them to another directly. You can also reset a module’s styles back to its preset’s saved state if you have made manual overrides that you want to undo. These actions are available through the right-click context menu on any module in the Visual Builder.
Practical Preset Workflows for Divi Designers
Knowing what presets are is one thing. Using them in a way that actually saves time on real projects is another. These are the workflows that make the most difference.
Set Up Presets Before Building Pages
The biggest mistake Divi designers make with presets is creating them after the site is already built. If you have already placed two hundred button modules across fifty pages, creating a preset afterward applies to new modules going forward but does not automatically update the existing ones. You would have to open each existing module and apply the preset manually.
The correct workflow is to design your presets first, on a blank page or a style guide page, before building any content pages. Define your button styles, heading styles, blurb card styles, and any other frequently used module types. Save them as presets, set your defaults, and then start building. Every module you place from that point forward starts with the correct styles automatically.
EXPERT OPINION Experienced Divi developers always start a new project with a style guide page. This is a private page, not linked from any navigation, that contains one example of every module type styled with the project’s design system. Each styled module becomes a preset. The style guide page then serves as a visual reference for the project and as the source for all preset updates going forward. If a client changes their brand color, you update it on the style guide page, save the preset, and the entire site updates in seconds.
Use Presets for Multi-Page Consistency
On websites with many pages built by multiple people, visual inconsistency is a persistent problem. One page uses a slightly different shade of blue for buttons. Another uses a different font size for headings. Presets enforce consistency by making the correct style the default. New contributors to the site who add modules automatically get the correct styles without needing to be trained on specific design decisions.
Combine Presets with Global Colors
Divi’s Global Color System, which you set up in Theme Options, works alongside Presets. When your preset’s colors reference global color values rather than hardcoded hex codes, changing a global color updates every preset that uses it across every page. This combination of Global Colors plus Presets is the closest Divi gets to a production-grade design system without writing any code. For a full explanation of how the global color system works, see our guide on Divi Theme Options: General Tab Settings Explained, which covers the color palette setup in detail.
Preset Management: Editing, Renaming, and Deleting
As your preset library grows, keeping it organized becomes important. Divi provides several management tools.
Editing a Preset’s Styles
To edit a preset’s styles, open any module that uses the preset, make your style changes in the module settings, and then use the preset dropdown to select Update Preset with Current Styles. The updated styles apply to all modules using that preset.
Renaming a Preset
Open the preset dropdown on any module using the preset. Click the three-dot menu next to the preset name and select Rename. Enter the new name and save. The name updates in the dropdown across all modules but the styles and assignments remain unchanged.
Setting a New Default Preset
Open the preset dropdown, hover over the preset you want to set as default, click the three-dot menu, and select Set as Default. New modules of that type will now start with this preset’s styles instead of the previous default.
Deleting a Preset
Open the preset dropdown, click the three-dot menu next to the preset you want to delete, and select Delete. Divi will ask you to confirm. After deletion, modules that used that preset revert to the site’s default styles for that module type.
NOTE Deleting a preset that is widely used across your site will remove its styles from every module that referenced it. Those modules will fall back to the default preset styles. If you are not sure whether a preset is in use, rename it to something like ‘UNUSED – Old Blue Button’ and leave it for a few weeks before deleting it.
Common Preset Mistakes and How to Avoid Them
Not Using Presets at the Start of a Project
Already covered above, but worth repeating. Setting up presets after a site is built means existing modules do not automatically inherit preset styles. Start with presets and you avoid a large amount of retroactive styling work.
Creating Too Many Presets with Small Differences
Some designers create a new preset for every minor variation, ending up with twenty button presets that are nearly identical. This defeats the purpose of presets. If two styles differ only in one property, consider whether that property can be overridden manually on the few modules that need the variation rather than creating an entire separate preset.
Updating a Preset Without Checking Site-Wide Impact
Before updating a preset, think about every module on your site that uses it. If the preset is used on fifty pages, an update affects all fifty simultaneously. Use the Divi History feature to create a restore point before making significant updates to widely-used presets.
Ignoring Option Group Presets in Divi 5
Option Group Presets in Divi 5 are underused by most designers. If your design uses consistent border radius values, shadow styles, or spacing across multiple module types, Option Group Presets handle this elegantly. Most Divi 5 users discover them late and wish they had used them from the start.
Frequently Asked Questions
Do Divi Presets work across all module types?
Yes. Every Divi module type supports presets, including Buttons, Text, Blurb, Image, Video, Slider, Gallery, Contact Form, Pricing Table, Testimonial, and all others. In Divi 5, presets also apply to Sections, Rows, and Columns in addition to modules. Each module type has its own independent set of presets.
Can I export and import Divi Presets to use on another site?
Yes. Divi Presets are included when you export your Divi layout using the Divi Library export function. In Divi 5, presets can also be exported as JSON files directly from the Preset Manager. When you import a Divi layout or preset file to a new site, the presets come with it. This makes it straightforward to maintain a consistent design system across multiple client sites.
What is the difference between a Preset and a Global Module in the Divi Library?
A Global Module in the Divi Library is a saved instance of a module, including its content and styles. When you edit a Global Module, all instances update. A Preset is only the style settings for a module type, without any content. Presets are for applying consistent styling to different modules with different content. Global Modules are for repeating the exact same module with the same content across multiple pages. Use both together for maximum efficiency.
If I apply a preset to a module, can I still make manual style overrides to that module?
Yes. Applying a preset sets the base styles, but you can still override individual style settings on a per-module basis. For example, if your Button preset sets the background color to blue but you need one specific button to be red, you can override the background color directly on that module. The preset remains assigned to the module, but the overridden property deviates from it. Note that if you later update the preset’s background color, the module with the manual override will retain its red color since manual overrides take priority.
Do presets slow down my Divi website?
No. Presets are a design-time feature stored in the Divi Builder database. They do not generate any additional code or scripts on the front end of your website. The CSS output for a module using a preset is identical to the CSS output for a module styled manually. There is no performance difference.
Can I use Divi Presets if I am on Divi 4 rather than Divi 5?
Yes. Presets were introduced in Divi 4.5 and are fully functional in all Divi 4 versions from that point forward. The core workflow of creating, applying, and updating presets is the same. Divi 5 adds the Preset Manager, Option Group Presets, and Design Variable integration, but the fundamental preset system in Divi 4 covers all the essential use cases.
What happens to modules that used Global Defaults when I upgrade from older Divi versions?
When Elegant Themes replaced Global Defaults with Presets, existing sites that used Global Defaults had those defaults automatically converted into a default preset for each module type. Existing modules retained their styles, and the converted preset became the default going forward. No manual migration was required.
Final Thoughts
Divi Presets are one of those features that only reveal their full value once you have used them correctly on a complete project. The first time you change a brand color across an entire site by updating one preset and watching every module update in seconds, the workflow makes complete sense.
The investment is front-loaded. Setting up presets at the start of a project takes twenty to thirty minutes. The return on that investment compounds across every page you build afterward. For any Divi project with more than ten pages, presets are not optional. They are the foundation of a maintainable design system.
Once you have presets set up, the next step in building an efficient Divi workflow is understanding the Divi Builder’s more advanced design controls.