When you first install Divi, the Theme Options panel is where you configure how your entire website behaves at a global level. The General Tab is the first thing you see, and it contains more settings than most people realize.
This guide covers every single setting in the Divi Theme Options General Tab — what each option does, what the recommended configuration is, and why it matters for your website. Both sub-tabs are covered: General and Performance.
To follow along, go to Divi > Theme Options in your WordPress dashboard. The General Tab will be selected by default.
New to Divi? Read: What Is Divi in WordPress? Theme, Builder, Modules & More
How to Access Divi Theme Options
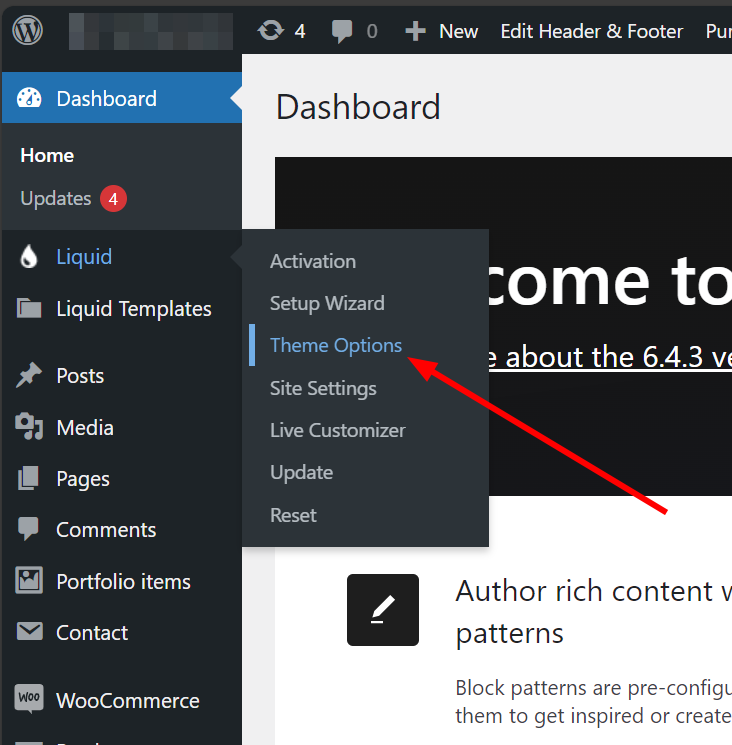
Log in to your WordPress admin panel. In the left sidebar, hover over Divi and click Theme Options. This opens the main Theme Options panel with tabs across the top: General, Navigation, Builder, Layout, Ads, SEO, Integration, and Updates.
Click the General tab. You will see two sub-tabs underneath it: General and Performance. This guide covers both.
General Sub-Tab Settings
The General sub-tab is where you configure your site’s visual identity, layout defaults, content behavior, and social media settings. Work through each setting from top to bottom when setting up a new Divi website.
Logo
This is where you upload your website logo. The logo you set here appears in the header area across your entire site.
Click Upload to open the WordPress Media Library. Select an existing image or upload a new one, then click Set As Logo. To remove the logo, click the Reset button.
- Use a PNG file with a transparent background so your logo looks clean on any header color.
- Recommended maximum width: 200px to 300px depending on your header height.
- If you are using the Divi Theme Builder to build a custom header, you can also set a dynamic logo there — but the logo uploaded here acts as the global fallback.
Fixed Navigation Bar
When this option is enabled, your navigation bar stays fixed at the top of the browser window as visitors scroll down the page. This is commonly called a sticky header.
Recommended: Enable. A fixed navigation bar reduces friction for visitors who want to navigate to another page without scrolling back to the top. This is standard practice on most professional websites.
NOTE If you have built a custom header using the Divi Theme Builder, this setting may not apply. The Theme Builder header has its own sticky options.
Enable Divi Gallery
When enabled, this replaces the default WordPress gallery style with Divi’s own gallery format. Divi’s gallery includes hover effects and a lightbox that opens images in an overlay instead of navigating to a separate page.
Recommended: Enable. The Divi gallery is visually cleaner and provides a better user experience than the default WordPress gallery, especially for photography or portfolio sites.
Color Pickers Default Palette
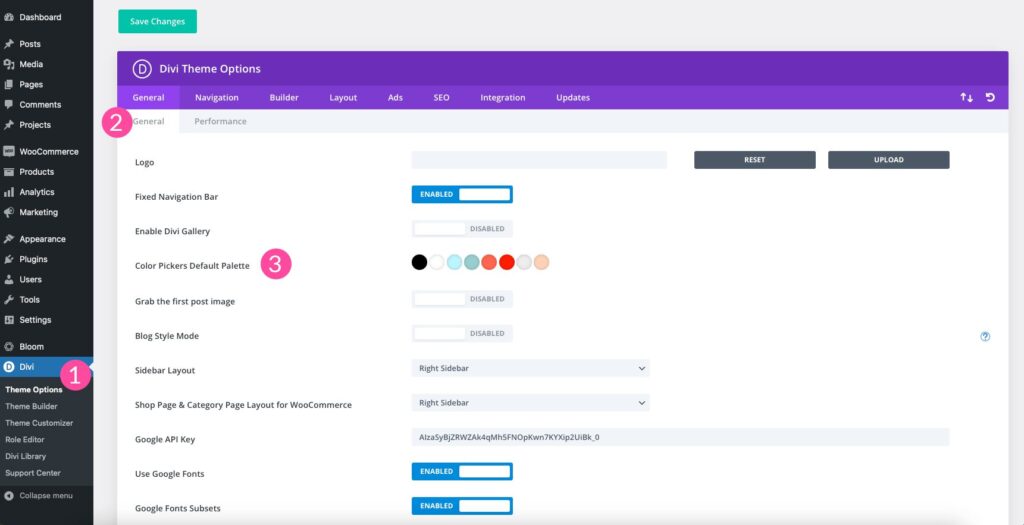
This setting lets you define up to 8 custom colors that appear in the color picker throughout the Divi Builder. Every time you open a color selector inside any module, these 8 colors appear as quick-select swatches.
Recommended: Set these to your brand colors immediately. If your brand uses specific hex values for primary, secondary, and accent colors, enter them here. This saves significant time when building pages because you can apply your exact brand colors with one click instead of entering the hex code manually every time.
TIP Even if you are not sure of your final brand colors yet, set placeholder colors here. You can update them at any time and the swatches will update globally across the builder interface.
Grab the First Post Image
By default, WordPress uses the Featured Image field as the thumbnail for blog posts. When this option is enabled, Divi will use the first image found in the post content as the thumbnail if no Featured Image has been set.
Recommended: Disable unless you have a specific reason to enable it. It is better practice to always set a Featured Image manually for each post. This gives you full control over how your posts appear in blog listings, social media previews, and search engine snippets.
Blog Style Mode
This setting controls how posts are displayed on blog index pages and archive pages. When disabled, Divi automatically truncates posts to show a short excerpt. When enabled, the full post content is displayed on the index page.
Recommended: Disable. Showing full post content on archive pages makes those pages very long and provides no reason for visitors to click through to the individual post. Using excerpts creates a cleaner browse experience and improves the click-through rate to your individual posts.
Excerpt Length
This sets how many words appear in the automatic excerpt shown on blog index and archive pages. The default is 270 characters.
Recommended: 150 to 200 characters is enough to give readers a clear sense of what the post covers without truncating mid-sentence in an awkward way.
Excerpt Style
Controls whether the excerpt ends with a simple ellipsis (…) or includes a Read More link. Set this to Read More so visitors have a clear clickable action that takes them to the full post.
Sidebar Layout
Sets the default sidebar position for blog posts and standard pages. Options are Left Sidebar, Right Sidebar, and No Sidebar.
Recommended: Right Sidebar for content-heavy sites, or No Sidebar for a cleaner, full-width look. Most modern Divi websites use no sidebar and rely on the builder for layout instead.
Shop Page and Category Page Layout for WooCommerce
If you have WooCommerce installed, this setting controls the default sidebar position on shop pages, product category pages, and single product pages. Only configure this if you are running an online store.
NOTE This setting only appears if WooCommerce is active on your site.
Post Info Section
This setting controls what metadata appears under the title on individual blog posts. You can choose to show or hide: Author, Date, Categories, Tags, and Comments count.
Recommended: Show Date, Categories, and Author at minimum. These three fields help readers understand the context of the post quickly and are also used by search engines to understand your content structure.
Show Comments on Posts and Pages
Toggles the comments section on blog posts and pages globally. You can also control comments on a per-post basis from the WordPress post editor.
Recommended: Enable on posts, disable on pages unless your pages specifically benefit from comments.
Date Format
Sets the format in which dates appear across your site. The default is a US-style format. Change this if your audience is primarily in a region that uses a different date format convention.
Social Icons in Footer
Divi includes a built-in social media icons section for the footer. Enter the URLs for your social media profiles here and Divi will automatically display the corresponding icons in your site footer.
Available platforms include Facebook, Twitter/X, Instagram, LinkedIn, YouTube, Pinterest, TikTok, and others. Leave any field blank and that icon will not appear.
Google Fonts Integration
This setting enables Google Fonts throughout the Divi Builder. When enabled, you can select from hundreds of Google Fonts in any typography setting inside the builder.
Recommended: Enable. Most Divi websites use Google Fonts for typography. Disabling this limits your font choices to system fonts only. The only reason to disable it is if you have strict data privacy requirements since Google Fonts loads from Google’s servers.
Google Maps API Key
If you plan to use Divi’s Map Module on any page, you need to enter a Google Maps API key here. Without an API key, the Map Module will not display a map.
To get an API key, visit the Google Cloud Console, create a project, enable the Maps JavaScript API, and generate a key. Paste the key into this field.
NOTE Google Maps API requires billing to be enabled on your Google Cloud account, but the free tier covers most small website usage volumes.
Enable Number of Posts for Pages and Archives
Sets how many posts appear per page on archive pages, category pages, search results, and tag pages. The default is 10.
Recommended: Increase to 20 to 30 for archive pages. More posts per page reduces the number of paginated archive subpages, which is better for crawlability and helps keep your topical content accessible without excessive pagination.
Custom CSS
A text area where you can add custom CSS that applies globally across your entire website. Any CSS entered here is added to the site’s stylesheet and overrides default Divi styles.
Recommended: Use this sparingly. If you are using a child theme, add custom CSS to the child theme’s style.css file instead. Using the Theme Options CSS box is fine for quick global tweaks, but a child theme is more maintainable long term.
Performance Sub-Tab Settings

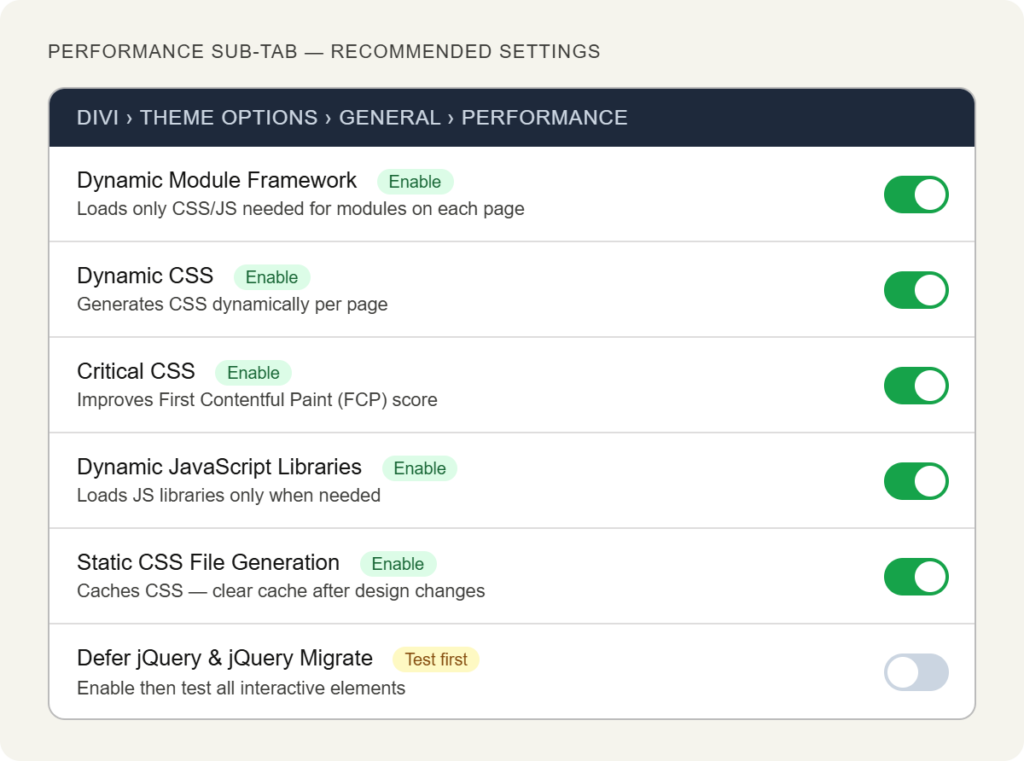
The Performance sub-tab contains settings that control how Divi loads CSS and JavaScript. These directly affect your website’s loading speed and Core Web Vitals scores.
Dynamic Module Framework
When enabled, Divi loads only the CSS and JavaScript required for the modules actually used on each individual page, rather than loading all Divi assets globally.
Recommended: Enable. This is one of the most impactful performance settings in Divi. Enabling it reduces the amount of CSS and JavaScript loaded on each page, which improves load time and Lighthouse scores.
Dynamic CSS
Generates CSS dynamically based on the specific design settings used on each page. Combined with Dynamic Module Framework, this reduces the total CSS payload significantly.
Recommended: Enable. Works best alongside Dynamic Module Framework.
Critical CSS
When enabled, Divi generates a critical CSS file containing only the styles needed to render the visible above-the-fold content. This CSS is inlined into the page HTML, allowing the browser to render the initial page view without waiting for external stylesheets to load.
Recommended: Enable. Critical CSS is one of the most effective ways to improve First Contentful Paint (FCP) scores, which is a key Core Web Vitals metric.
Dynamic JavaScript Libraries
Controls whether Divi loads JavaScript libraries only when they are needed on a specific page. When disabled, all JavaScript libraries load on every page regardless of whether they are used.
Recommended: Enable. Reduces JavaScript payload on pages that do not use features requiring those libraries.
Static CSS File Generation
When enabled, Divi generates static CSS files and caches them rather than generating CSS on each page request. This reduces server processing time and speeds up page delivery.
Recommended: Enable. After enabling, click the Clear Divi Cache button that appears on this page to regenerate fresh static files. Do this any time you make significant design changes in the Divi Builder.
TIP If you make a design change in the builder and do not see it reflected on the live site, clearing the Divi cache usually resolves it.
Defer jQuery and jQuery Migrate
Defers the loading of jQuery and jQuery Migrate scripts so they do not block the initial page render. This can improve page load metrics but may cause compatibility issues with some plugins that require jQuery to load immediately.
Recommended: Enable, then test thoroughly. Check all interactive elements on your site including menus, sliders, contact forms, and any plugins that use JavaScript. If anything breaks, disable this option.
Recommended Settings for a New Divi Website
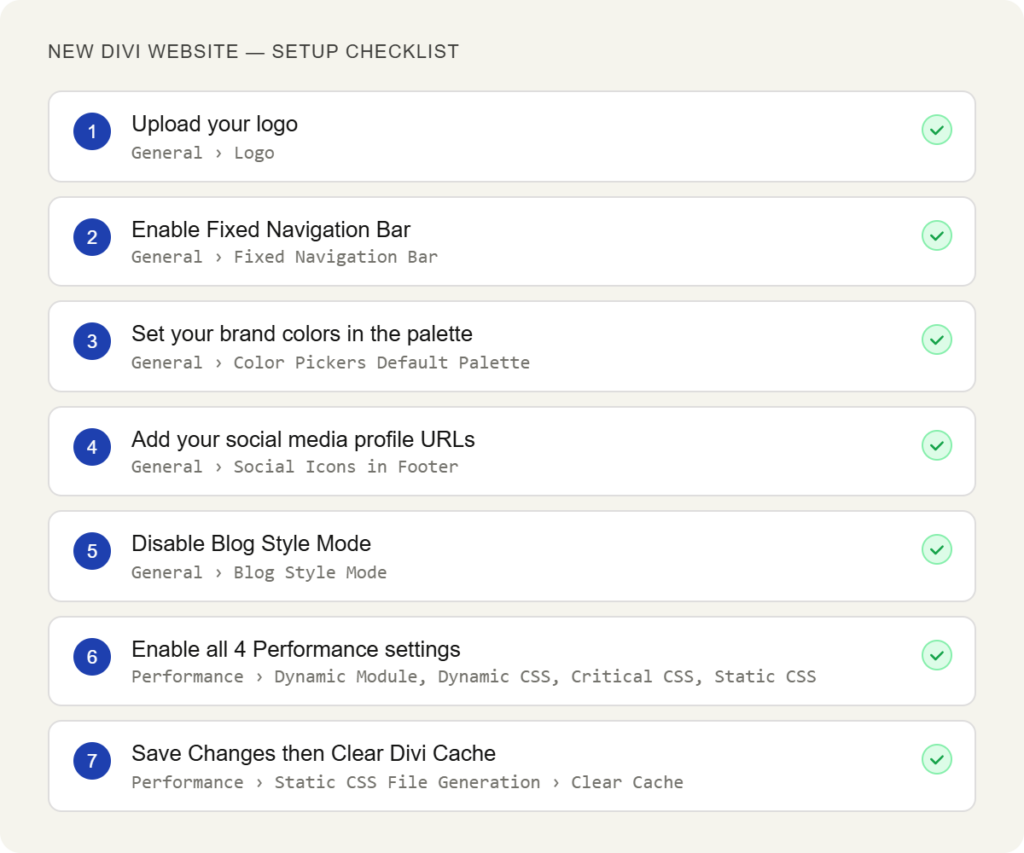
If you are setting up a new Divi website and want to know which settings to prioritize, work through this checklist in order.
- Upload your logo — General > Logo
- Enable Fixed Navigation Bar — General > Fixed Navigation Bar
- Set your brand colors in the color palette — General > Color Pickers Default Palette
- Add your social media profile URLs — General > Social Icons in Footer
- Enable Google Fonts — General > Google Fonts Integration
- Disable Blog Style Mode — General > Blog Style Mode
- Enable Dynamic Module Framework — Performance > Dynamic Module Framework
- Enable Dynamic CSS — Performance > Dynamic CSS
- Enable Critical CSS — Performance > Critical CSS
- Enable Static CSS File Generation — Performance > Static CSS File Generation
- Click Save Changes and then Clear Divi Cache
This baseline configuration handles the most important visual identity settings and activates the key performance optimizations. Everything else can be adjusted as your site grows.
Settings That Are Often Overlooked
Most Divi users set their logo and move on. These settings are frequently missed but have meaningful impact on how your site performs and how it looks.
Color Pickers Default Palette
Not setting your brand colors here is the most common missed opportunity in Theme Options. When your colors are in the palette, every designer and content editor working on the site can apply the correct brand colors instantly. Without it, colors get applied inconsistently across pages.
Post Excerpt Length and Blog Style Mode
Leaving Blog Style Mode enabled means your blog index pages load full post content — sometimes thousands of words per page. This slows the page and creates a poor reading experience. Disable it and set a sensible excerpt length instead.
Performance Sub-Tab
Most new Divi users never visit the Performance sub-tab. Enabling the four core performance settings there — Dynamic Module Framework, Dynamic CSS, Critical CSS, and Static CSS File Generation — can meaningfully reduce page weight and improve load times without requiring any technical expertise.
Related Divi Guides on wpdivizone.com
If you are working through your initial Divi configuration, these guides cover the next steps after Theme Options setup.
After setting up Theme Options, the next step is installing and activating the Divi Builder. See our complete guide: Divi Theme Setup: How to Buy, Install and Configure It the Right Way
For a complete overview of what Divi is and how it works before diving into settings, read: What Is Divi in WordPress? Theme, Builder, Modules & More
If you are still deciding whether to purchase Divi, see our breakdown: Divi Pricing & Discounts: Annual vs Lifetime Plan
Ready to start building your first page? Read: Getting Started with Divi Builder (Step-by-Step)
Frequently Asked Questions
Where do I find Divi Theme Options in WordPress?
Go to your WordPress dashboard, look for Divi in the left sidebar, hover over it, and click Theme Options. The General Tab is selected by default when the panel opens.
Will changing Theme Options affect pages I have already built?
Some settings will. Logo, fixed navigation, social icons, and footer changes affect the entire site. Performance settings apply globally. Settings like sidebar layout and post excerpts affect how content is displayed on archive and index pages. Individual page designs built with the Divi Builder are not affected by Theme Options changes.
Should I use the Custom CSS box in Theme Options or a child theme?
If you are making small, global tweaks, the Custom CSS box in Theme Options works fine. If you are adding significant amounts of custom CSS or making changes that affect multiple pages, use a child theme. Child theme CSS is more maintainable and will not be affected if you ever reset Theme Options.
What is the difference between the General Tab and the Divi Customizer?
Divi Theme Options handles global site configuration: logo, performance, content defaults, and social icons. The WordPress Customizer (Appearance > Customize) handles some overlapping settings like colors and fonts but is gradually being phased out in Divi in favor of the Theme Builder and Theme Options. For most settings, use Theme Options.
Do the Performance sub-tab settings affect the WordPress editor or just the front end?
Performance settings in Divi Theme Options only affect the front-end output of your website — what visitors see in their browser. They do not change how the Divi Builder or WordPress editor behaves in the admin panel.
I enabled Static CSS File Generation but my design changes are not showing up. What do I do?
Click Save Changes in Theme Options, then look for the Clear Divi Cache button on the same page and click it. This regenerates the static CSS files with your latest design changes. This is the most common cause of changes not appearing on the live site after enabling static CSS.
Can I set different logos for desktop and mobile in Theme Options?
No. The Theme Options logo setting applies to all devices. For different logos on desktop and mobile, use the Divi Theme Builder to build a custom header and configure separate logo settings for each device breakpoint.
Final Thoughts
The Divi Theme Options General Tab covers more ground than most users initially expect. Logo and branding settings are just the beginning. The color palette, performance sub-tab, and content display settings have a direct impact on both the visual consistency of your site and how quickly it loads for visitors.
The best time to configure these settings is immediately after installing Divi, before you start building pages. Getting the Performance sub-tab settings right from the start means every page you build benefits from optimized CSS and JavaScript loading without any extra effort.
Save your changes, clear the Divi cache, and then move on to building your first pages with the Divi Builder.